Why does the VicoHome camera not connect successfully after scanning the QR code?
If the camera fails to scan the QR code generated from the app, the causes may be as follows. Please check them one by one.
The camera is not in scanning mode (emits a continuous “Ding Dong Ding Dong” sound)
For the battery camera, please turn on the camera and then double-click the power button.
For the plug-in camera, please unplug and re-plug to ensure the power adapter and the power cable are connected properly. If it still does not work, you can find the reset button on the top of the camera and then press and hold it for 3s (for some models, you may need to find the reboot hole on the top of the camera and then press the reboot hole with the pin included in the box or a pointed object like a needle for 3s).
The camera’s lens is not clean
Please remove the plastic protective film first.
Please clean the camera’s lens if it is dirty. Please avoid leaving fingermarks on the camera’s lens.
The camera can not find the focus of the QR code
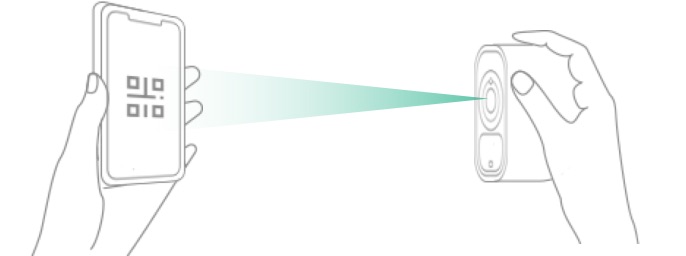
Please make sure the phone and camera are aligned and slowly move the camera back and forth to the QR code on the phone to find the focus.
The distance between the camera and the phone should be about 6~12 inches (15~30 cm).
Please do not scan the QR code in a backlight or dark environment.
If the issue still persists, please submit feedback from the app for further technical assistance.
Why does the VicoHome camera report an error after scanning a QR code?
Camera reports a “Wi-Fi SSID not found” error
- The camera only supports 2.4GHz Wi-Fi. Please make sure to connect the camera to 2.4GHz Wi-Fi.
- Please make sure that the Wi-Fi signal exists and works. You can try to connect the Wi-Fi to your phone, if you can normally surf the Internet, it means that the Wi-Fi works.
- The error may be caused by the camera being too far away from the Wi-Fi router. Please place the camera near the Wi-Fi router or as close to the Wi-Fi router as possible.
- It is recommended that the Wi-Fi SSID (name) not contain special characters or be too long. If the Wi-Fi SSID (name) contains special characters or is too long, please try to simplify the Wi-Fi SSID (name) and try again.
Camera reports a “Wi-Fi password error” error
- Please double-check the password you entered and make sure it is correct. And please pay attention to special characters, e.g. white space.
- It is recommended that the password of the Wi-Fi not contain special characters or be too long. If the password of the Wi-Fi contains special characters or is too long, please try to simplify the password and try again.
Camera reports a “Cloud service connection fail” error
If the camera reports a “Cloud service connection fail” error, it means that the camera fails to build the connection with the cloud server.
- Please make sure that your Wi-Fi router is connected to an available network. You can try to connect the Wi-Fi to your phone, if you can normally surf the Internet, it means that the Wi-Fi works.
- If it is but the issue still exists, please restart your Wi-Fi router and try again.
- If the issue still exists after restarting the Wi-Fi router, it’s very possible that there is some restriction(s) on the Wi-Fi router. In this case, you can try the below:
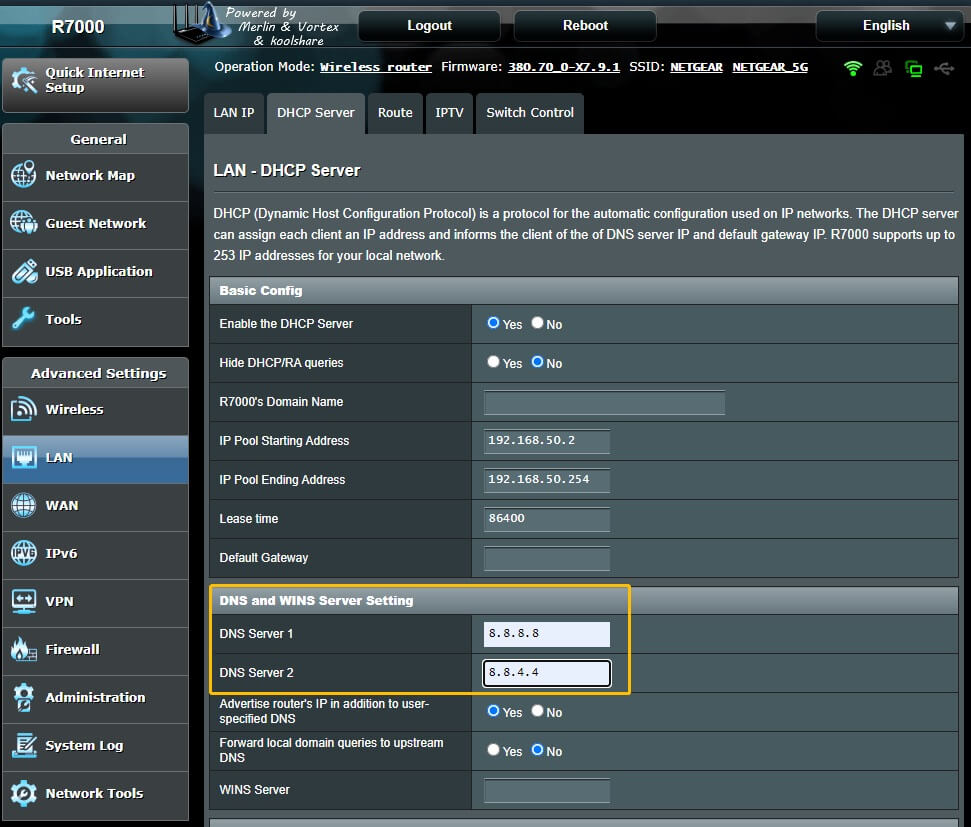
- Remove the restriction on the Wi-Fi router: enter the router’s admin address in the browser address bar (usually the admin address will be written on the router‘s body) > enter the admin password to go into the admin site > click LAN > click DHCP Server > Set Server 1 as 8.8.8.8 and Server 2 as 8.8.4.4 under “DNS and WINS Server Setting”.
- If possible, reset and re-configure your Wi-Fi router.
- If possible, try to connect the camera to another Wi-Fi.
Camera reports an “Authentication error” error
- The error can be caused by the router’s authentication method not being supported.
Please set the router’s authentication method as WPA-PSK or WPA2-PSK. And please note that the camera only supports the AES encryption algorithm while the TKIP encryption algorithm is not supported.
2. The error can also be caused by special authentication methods like SMS/Web authentication being enabled.
- Please disable any special authentication method like SMS/Web authentication.
- If possible, try to connect the camera to another Wi-Fi.
Camera reports a “Retrieving IP timeout” error
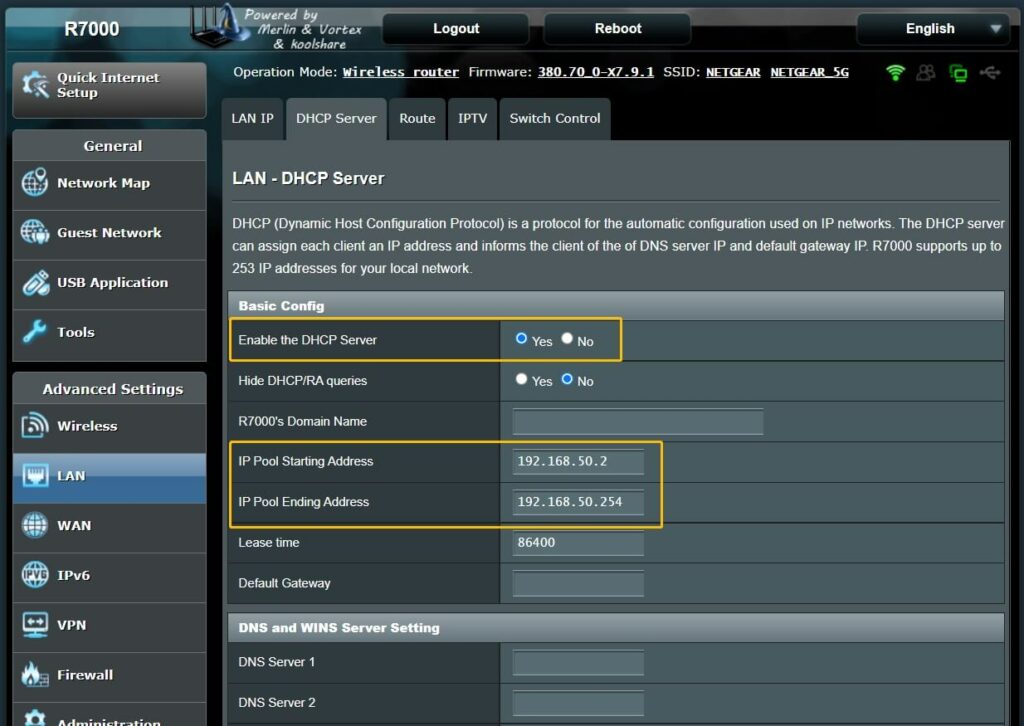
- The error can be caused by the DHCP server of the router not being enabled.
Please enter the router’s admin address in the browser address bar (usually the admin address will be written on the router‘s body) > enter the admin password to go into the admin site > click LAN > click DHCP Server to make sure the DHCP server is enabled and the IP Pool Address is set correctly.
2. The error can also be caused by there being too many devices connected to the router so the camera fails to get an IP from the router.
- Please try to restart the router and try to connect the camera again.
- If possible, try to connect the camera to another Wi-Fi.
If the camera reports nothing or you are still unable to connect the camera after trying the listed solutions, please submit feedback from the app for further technical assistance.
Why can’t I find the QR code on the VicoHome camera?
The QR code on the camera body includes the model and the serial number of the camera. It is usually on the label attached to the camera.
You can find it at the back of the camera.
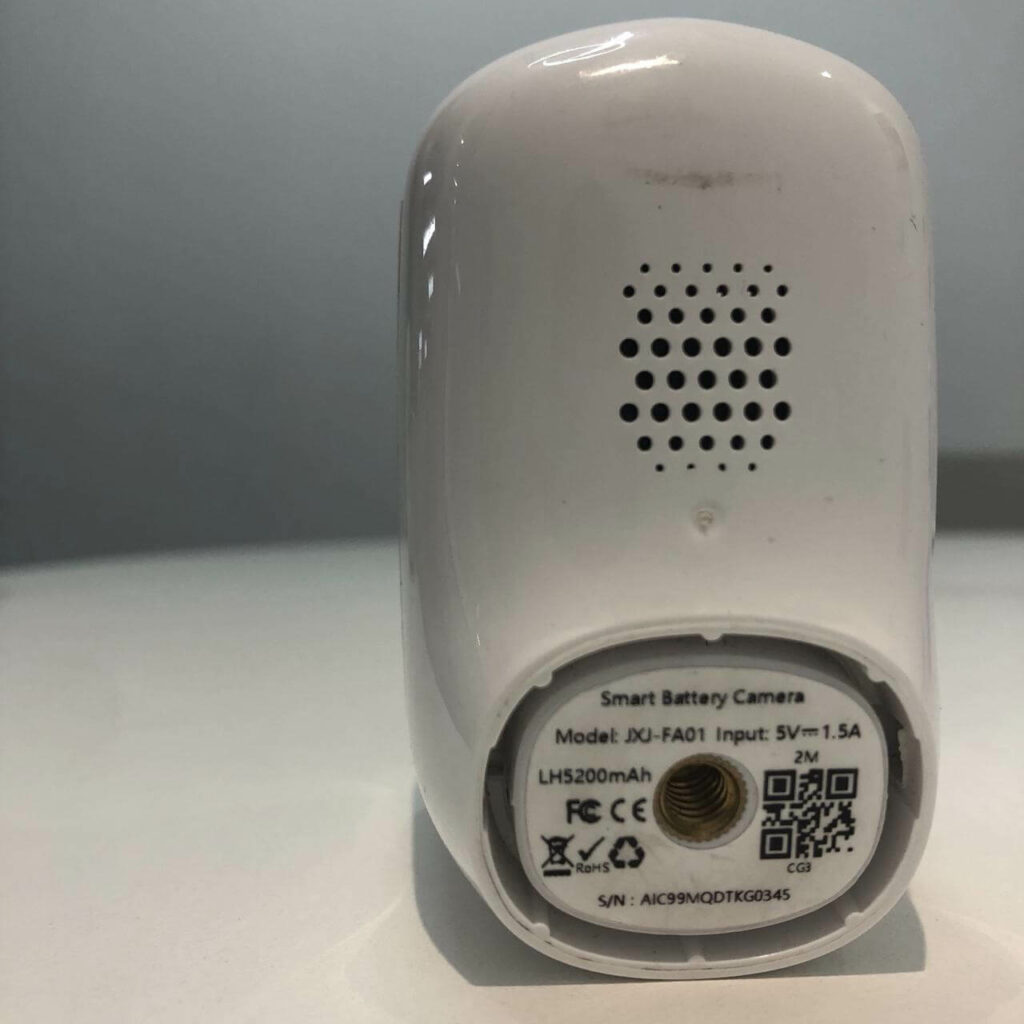
For some models, you may need to take off the outer shell of the camera to find it.
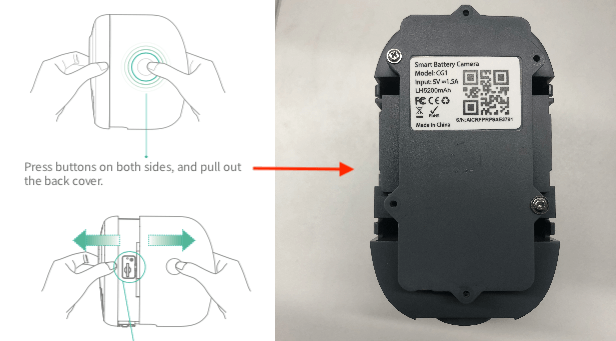
For other models, there is no QR code on the camera body. In this case, you can submit feedback for further technical support directly.
Why can’t I access my VicoHome camera?
When the camera is added successfully, you can see the camera on the homepage of the App. Next, you can tap the arrow button to view the live stream of the camera. The following reasons may lead to the failure to open the live feed of the camera, please check one by one.
The camera disconnects from Wi-Fi or the camera’s Wi-Fi connection is unstable
The router does not work
Please check whether the router is working. You can judge by checking whether other devices (such as mobile phones) can connect to the Wi-Fi and can access the Internet. If this router is indeed not working, please make sure it works first.
The Wi-Fi signal is unstable
Please move the camera as close to the router as possible. If possible, please boost the signal strength of your router.
You can try restarting the router.
You can try connecting the camera to another Wi-Fi or another phone’s hotspot.
The mobile phone cannot access the Internet or its network connection is unstable
Please make sure that your phone can access the Internet.
Please make sure that the mobile phone has enabled the network permission for the APP.
You can try to access the live stream again after pulling down on the APP homepage to refresh the device list.
You can try to access the live stream when the phone’s Wi-Fi connection is good.
You can try to connect another Wi-Fi to your phone or switch to a mobile network to access the live stream again.
You can try to access the live stream again on another phone.
Camera is off
Please confirm whether the camera is turned on, if not, please long-press the power button to turn it on. If the camera cannot be turned on, please confirm whether the camera has battery power. If the camera is out of power, please use a 5V/1.5A charger to charge the camera before turning it on.
Other possible solutions
Restart the camera.
Readd the camera.
If you still cannot access the live stream, please submit feedback for technical support.
Why does the video look blurry?
The following factors may lead to blurry image/picture. Please check them one by one.
- Please make sure the protective film on the camera lens is removed.
- Please make sure the camera lens surface is clean, is not covered by any object, and is not scratched or worn.
- When the camera’s network connection is poor, the image quality may be affected. In SD mode (720p), the image/picture is more blurred than in HD mode (1080p).
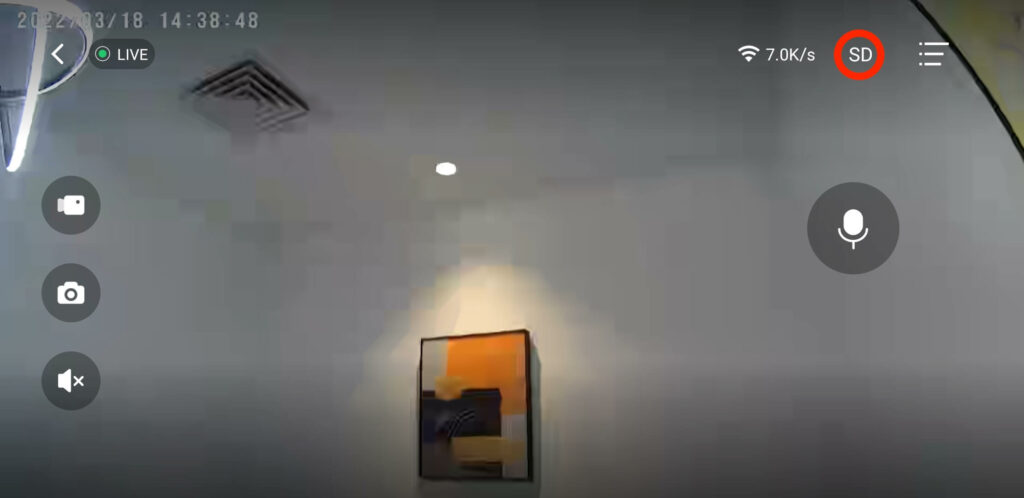
- To get a clearer live image, you can tap the “full screen” icon in the bottom right corner of the live window > tap “SD” and change it to “HD”.
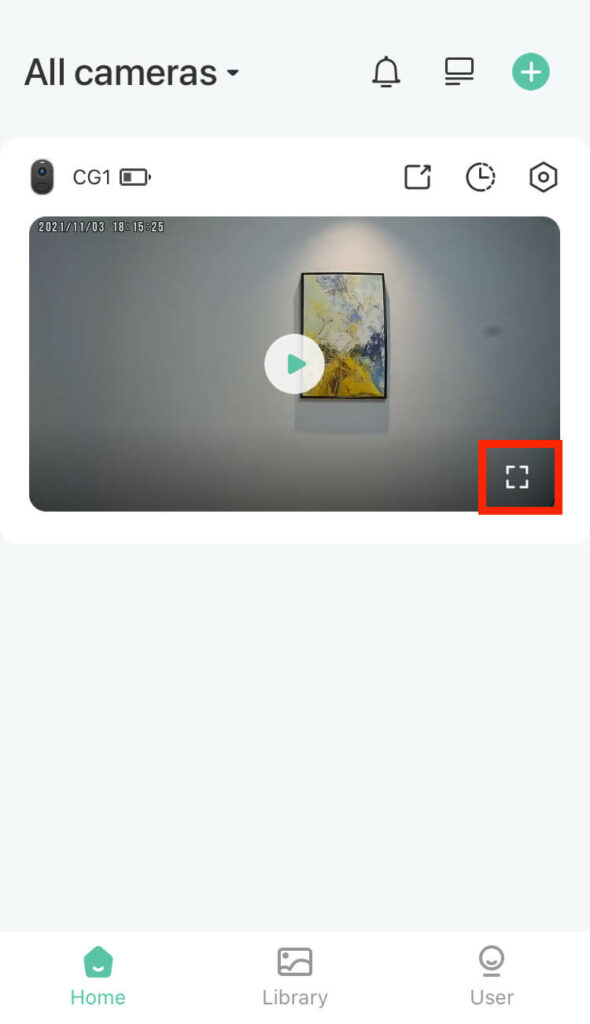
To get a clearer playback/recording image, you can tap the camera “setting” icon > tap Motion Detection > tap “Resolution” > Select “HD”.
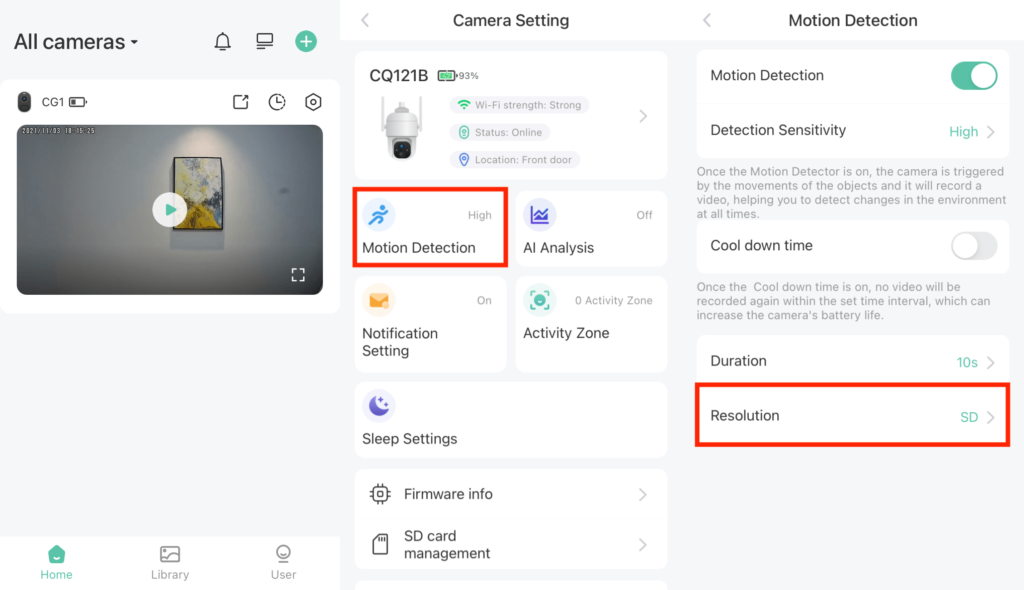
Please note that HD will use more network data (bandwidth) and will consume more battery power.
- If the camera falls from a height, the imaging components may get damaged. If the camera malfunctions due to a hardware issue, please contact the seller directly.
How to change the resolution of the live video?
Please tap the “full screen” icon to enter the full screen live > find the “SD/HD/Auto” button and adjust the resolution of the live screen.
- SD (Standard Definition): 720P, doesn’t offer the same quality as HD but will use fewer network data (bandwidth) and consume less battery than HD. It applies to not-so-good network conditions.
- HD (High Definition): 1080P, offers higher quality video and a better overall viewing experience.
- Auto: 720P or 1080P, depends on your current network status. If it is good, the live screen will be HD; if it is poor or unstable, SD will be selected automatically.
How to change the time of my VicoHome camera?
The time in the upper left corner of the video (live video, cloud video, and microSD video) is decided on the time zone where the camera is located.
Usually, the time zone of the camera is the same as the time zone of the phone. If the current time is not what you want, you can adjust it by changing the time zone for the camera.
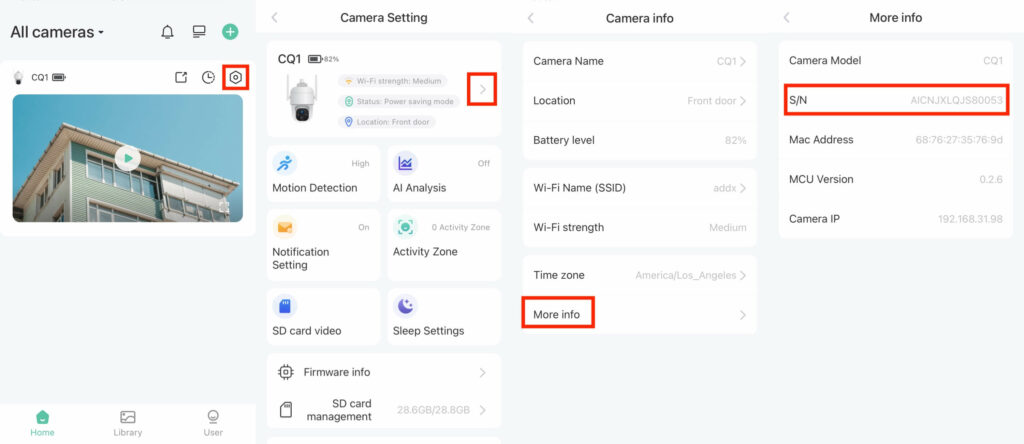
How to change time zone: tap the camera “setting” icon > tap the “>” extension icon > tap “More info”> tap “Time Zone”.
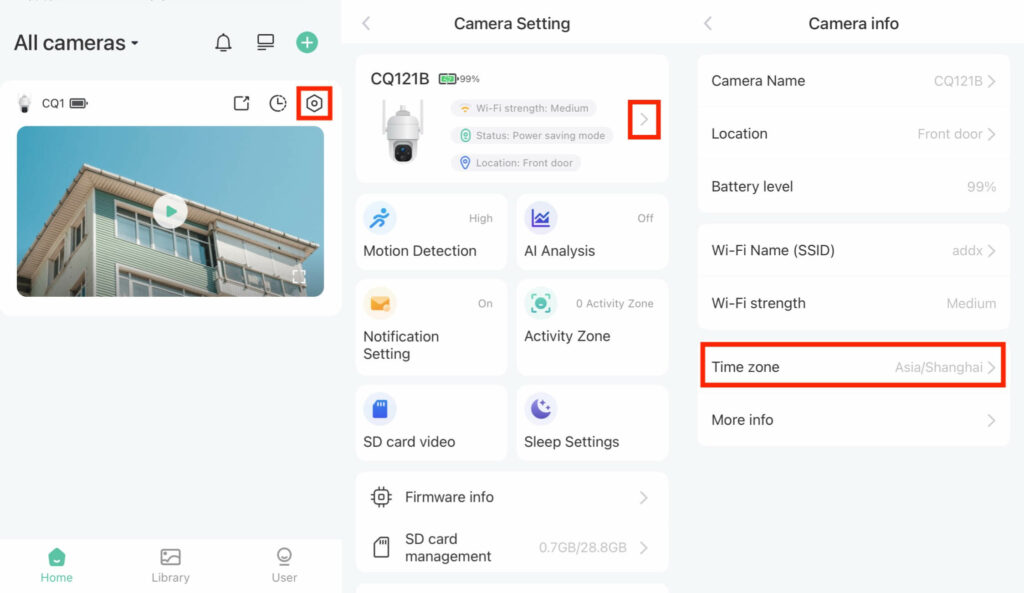
If you want to change the time from military time (24-hour) to regular Time (12-hour), we are working on it, stay tuned!
How to share your VicoHome camera with others?
Once you add a camera to the app, you become the admin of the camera. If you want to add an additional user to watch the camera on multiple devices, let’s say, you want to make another person (your family member or your friend) be able to access the camera on his or her phone, you can share your camera with that person. The shared user needs to download the app and register a new account first. Below are the sharing steps:
Face to Face Sharing
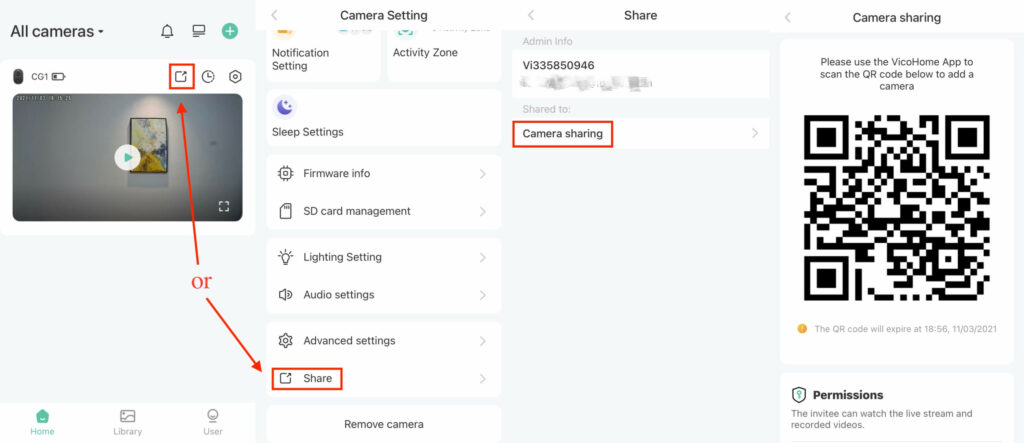
Step 1 Generate the share QR code of the camera
The camera admin taps the Share icon (![]() ) on the live window on the homepage or taps the Share button on the Camera Setting page, then taps the Camera sharing button to generate a share QR code of the camera.
) on the live window on the homepage or taps the Share button on the Camera Setting page, then taps the Camera sharing button to generate a share QR code of the camera.
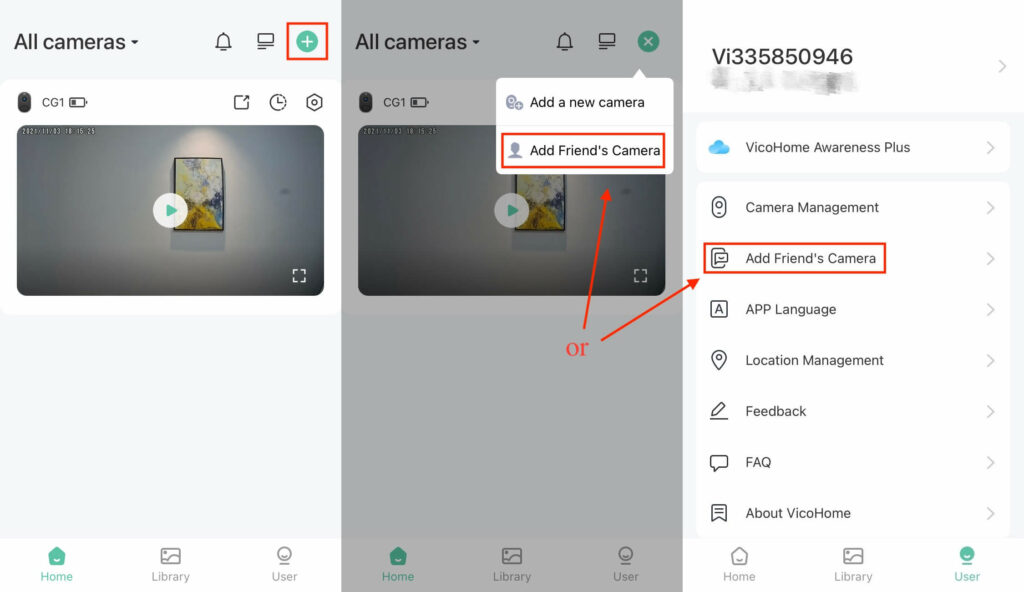
Step 2 Scan the share QR code using the shared user’s phone
The shared user taps the + icon (+) on the top right of the homepage, then taps the Add Friend’s Camera button. He/she can also directly tap the Add Friend’s Camera button from the User page. Then scan the generated share QR code.
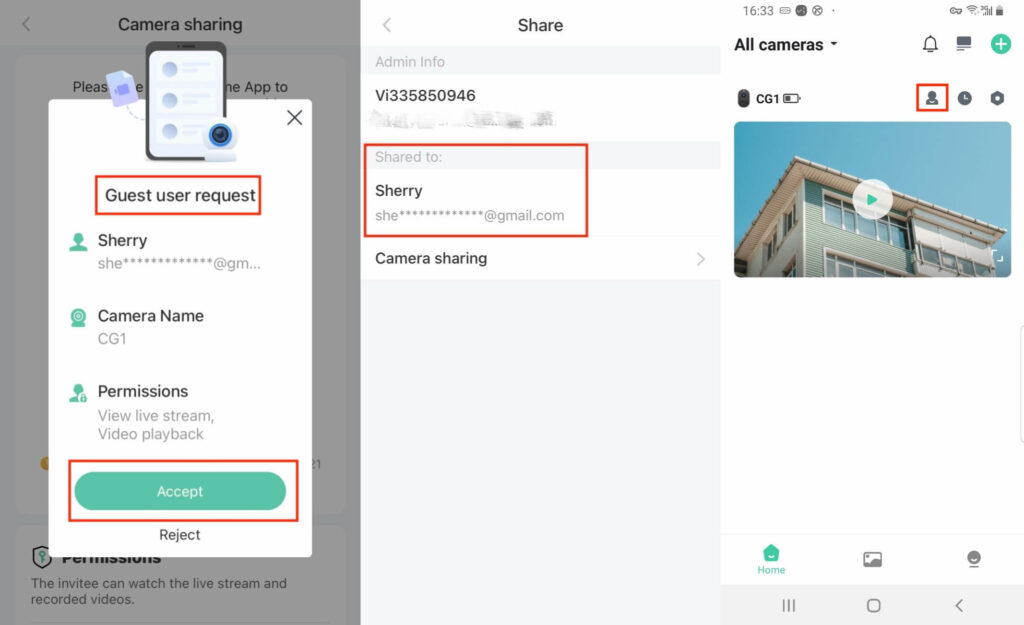
Step 3 Accept the camera access request
After successfully scanning the share QR code, the camera admin will receive a guest user request. Accept the guest user request, then the shared user will be able to see the camera on the homepage and access the camera. The Person icon indicates this is a shared camera. The camera admin can check the shared account on the Share page.
Remote Sharing
Step 1 Generate the share QR code of the camera
The camera admin taps the Share icon (![]() ) on the live window on the homepage or taps the Sharebutton on the Camera Setting page, then taps the Camera sharing button to generate a share QR code of the camera.
) on the live window on the homepage or taps the Sharebutton on the Camera Setting page, then taps the Camera sharing button to generate a share QR code of the camera.
Step 2 The camera admin screenshots the share QR code and then sends it to the shared user.
Step 3 The shared user saves the screenshot.
Step 4 Scan the screenshot of the share QR code using the shared user’s phone
The shared user taps the + icon (+) on the top right of the homepage, then taps the Add Friend’s Camera button. He/she can also directly tap the Add Friend’s Camera button from the User page. Then tap the Picture icon on the top right and then choose the saved screenshot to scan.
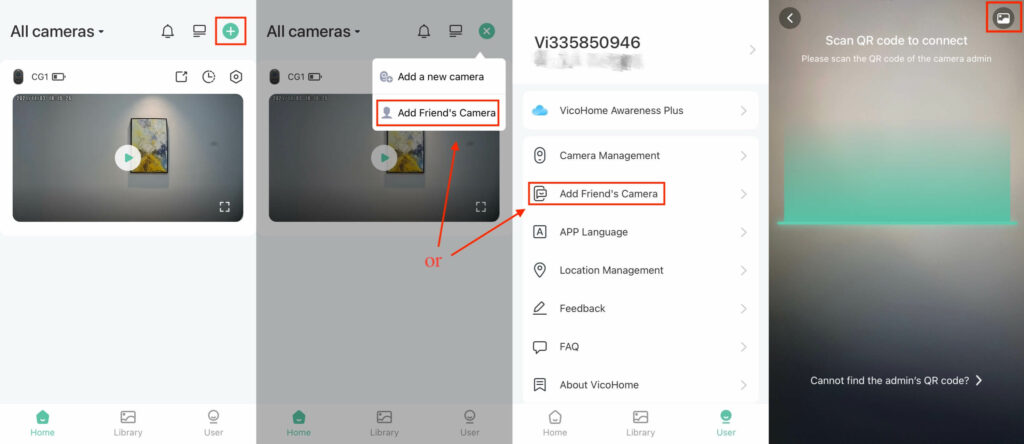
Step 5 Accept the camera access request
After successfully scanning the share QR code, the camera admin will receive a guest user request. Accept the guest user request, then the shared user will be able to see the camera on the homepage and access the camera. The Person icon indicates this is a shared camera. The camera admin can check the shared account on the Share page.
Can multiple users log in to VicoHome at the same time?
For privacy protection and account security, one account can only be allowed to log in on one phone at the same time. If the same account is logged in on the second device, it will be forced to log out on the first device.
However, if you want to access your camera on two or multiple devices, you can achieve it by sharing the camera.
Notes:
Only the main account with cameras set up has the right to share his/her camera with other devices or people.
Please make sure the shared user has been registered and logged in to the App first.
Please make sure the shared user is in the same login environment/country as your main account (owner).
How do I stop sharing VicoHome cameras?
If you’re the admin of a camera, you’ll have full control over whether another user (e.g. your family) has access to the camera. If you want to remove a user with whom you already shared access to your camera, you can follow the following steps:
Step 1 Open the APP
Step 2 Tap the camera Share icon (![]() )
)
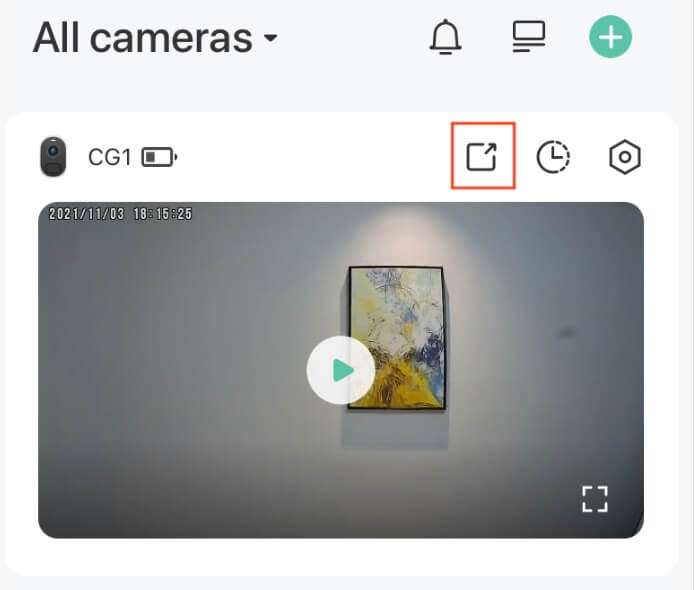
Step 3 Swipe the account of the shared user to the left and you will see a Delete button
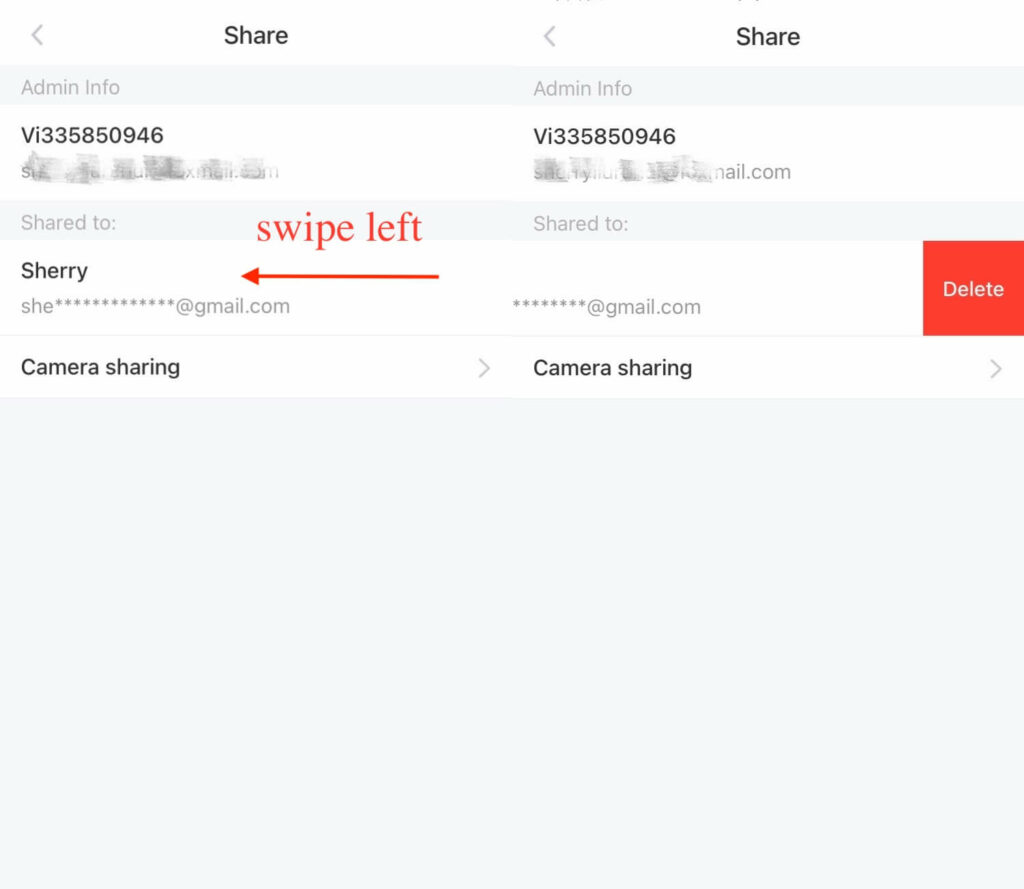
Step 4 Tap the Delete button
And you’re all set!
What are the permissions of shared users?
The shared users are allowed to watch the live, play the cloud recordings in the Library in the app, and receive notifications when the camera detects any movements.
If the admin inserts an SD card into the camera, the shared user is also able to access the backup videos on the SD card.
The shared users are not allowed to manage the settings of the camera, such as enabling or disabling Motion Detection & Notification, changing Light Setting & Audio Setting, or deleting cloud recordings.
However, the admin will be able to give the shared users more setting permissions in future updates. Stay tuned!
How to find the serial number of my VicoHome camera?
When you encounter an issue and the issue isn’t able to be resolved after a simple technical self-check, the serial number (S/N) of the camera is needed for our tech team to further investigate the issue.
The serial number (S/N) of the camera is usually written on the label attached to the camera body, starting with (S/N).
Usually, there is a QR code next to the serial number on the label attached to the camera body. The QR code also includes the camera’s serial number.
If you use your phone’s camera or phone’s scanner to scan the QR code, the scan result will be the camera’s serial number.
If you use our app to scan the QR code when submitting feedback, after tapping the “Scan QR Code” button, the scan result will also be the camera’s serial number.
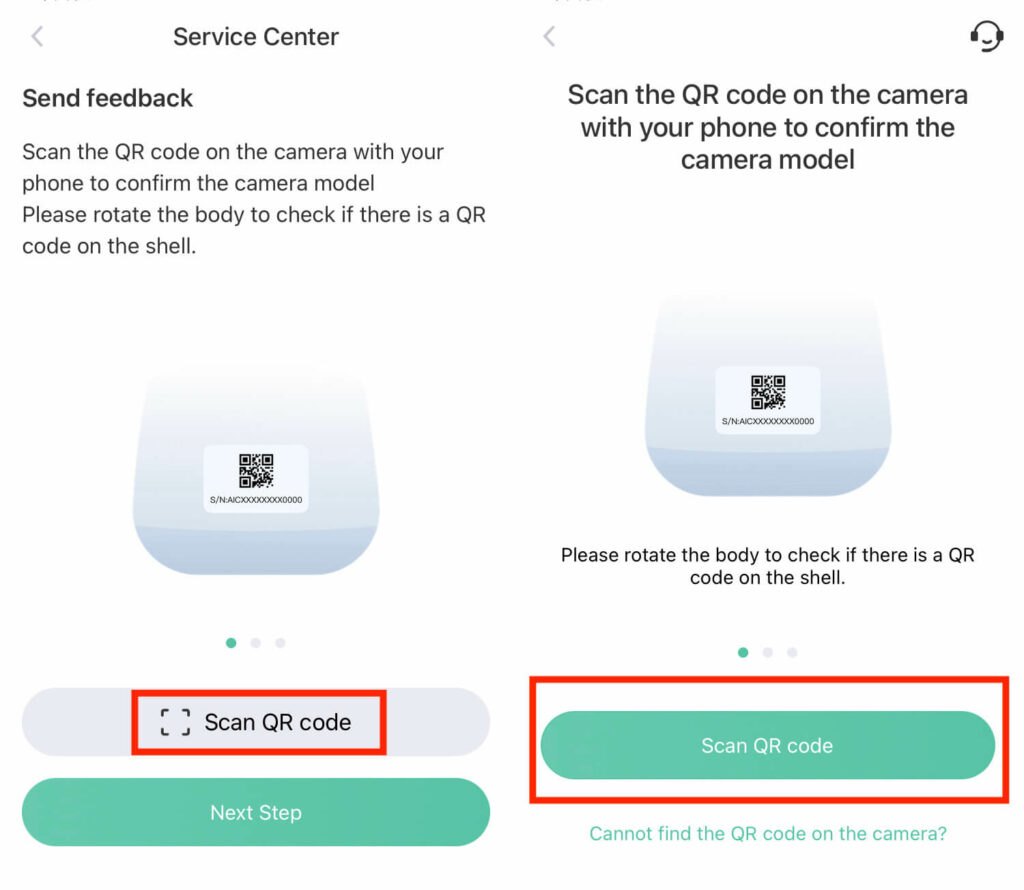
If you have added the camera to the app, you can also tap the camera “setting” icon > tap the “>” extension icon > tap the “More info” button to find the camera’s serial number.




I was having connections problems using a wifi cellular hotspot that are now fixed. Here’s a description of the issue:
——-
I keep getting “Cloud Sevice Connection” error. I’m using a Wi-Fi extender TPLink RE 220 connected to a T-Mobile cellular hotspot. I have reset both the extender and hotspot. I have verified that I have a strong internet connection, and can see that the camera has connected successfully via Wi-Fi to the extender. It gets to the “Device found” step then stops there with the spinning wheel. After a while I get the error message. I’m using the iOS app with iOS version 16.1.1. Same issue with 3 cams
——-
Miraculously this is now fixed: T-Mobile had to have me change the APN (Access Point Name I think) settings on the hotspot. Works well now. You have to be persistent, they kept insisting it was a temporary and recent problem with a tower.
I recently purchased a second Vicohome security camera but don’t know how to sync it with my other camera on the app. Is it possible to use both cameras at once? Please advise.
Thank you
How many users can VicoHome share with?
When viewing live why is it not recording also?
It keeps telling me invalid code
Why is it that my camera will only record up to 20 seconds? If I purchased the package rather than have The free lite package, Can I record longer durations?
Can you livestream with out subscription? Mine says livestream timed out.
when I manually press the record video, where on my device is the video being stored? Its not in the camera and I have searched all over my phone and can not find the video.
Used camera for one year with no problem. h started have a trouble to connect, only after resetting starts working, again,and this happens every 4-5 days.
Please advise.
I’m having a login issue. I get error msg device not registerd in selected country. Selected country is united states. Didn’t have this issue until I tried logging in with my new phone. I don’t understand what’s going on
Sorry the error msg was account not registered in selected country. But it was registered in selected country
When I try to share with another phone, it gets to the QR CODE on the admin’s phone, but it does not scan the Admins QR code. It just sits there and does nothing. Any ideas?
how does the shared user delete the camera videos off their phone? it says only administrator can delete them. The administrator deleted them off their phone but they are still on the shared users cell?